Typical Git Workflow
By Christopher Williams
Hello and welcome to the mini project for "Ry's Git Tutorial Review"!
The project can be downloaded here.
The readme file contains the same infomation as this page so pick which ever one you want to use.
This mini project is going to be a bit different to the other projects for the simple reason that Git is a type of version control so there is nothing to create that showcases what you can learn from the book so instead this will be a small exercise that shows a typical workflow using Git.
First let's explain what Git is so you understand why you would want to learn about it. Git is a distributed version control system, which means that it can store many different versions of a particular software program. The distributed part means that these many different versions can be stored individually on different computers and then later sync them, which is called merging, together to form the "master" version. This is incredibly useful because many different software designers can work on the same piece of code at different parts and then merge them together later on a master version of the software without causing any issues for anyone that is still working on the code (bugs can emerge though when you sync the different parts together in this new version so be careful about that when you work).
Today your boss has asked you to do a quick and easy job of copying a Git repository from a Git bundle, adding a new file to the local Git repository that is created from that bundle and finally uploading it to the bare repository.
First let me tell you what is a Git bundle and a bare repository. A Git bundle is a physical way to send someone a repository so it works just like a remote repository. A remote repository is a repository that you can access over the internet to copy the code from.
A bare repository is a repository that works as a central repository so it only stores different snapshots, which are previous versions of the program, without allowing you to develop inside of the repository so it is an easy area to copy from without messing with anyone else's work in progress.
Now let's get to work!
We will be using the Git command line which can be downloaded here
https://git-scm.com/downloads
The first step is to copy the repository, which is called cloning in git, from the Git bundle by using this command in Git.
git clone repo.bundle Home_Respository -b masterThis works exactly like remote repositories but we will get into the small difference at the end.
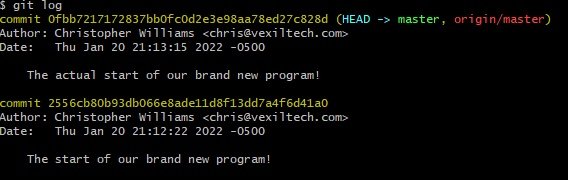
The next step is to go into that newly created file, which is our local repository, and check the Git log to see all of the previous snapshots to the repository. When you are in that file use this command.
git log
All you need to do is to drag the new file, found in the main file project file, into our local repository to replace that version of the file in the local Git repository.
First let’s see if the new file has replaced the old by using the command in the local repository
git status
If the name of the file is red and says
"modified: fizzbuzz.py"
then it was successful!
Now we need to add the file to the staging ground and then commit the file to Git with a new snapshot.
git add fizzbuzz.py
Lets check if it was successfully staged with same command as before
git status
and now it should say the same thing as before but in bright green instead.
"modified: fizzbuzz.py"
Lets finally commit it to the git log with this command
git commit -m “This is where we post a message for the log”
You can omit the -m with the quotation points and instead Git will open a text editor where you can type in a message. Enter your message and just exit the text editor to save it though the -m is an easier way to do the same thing.
Hurray! Let's tag it so if we need to find it later it will be easy to do.
git tag -a version_2.0 -m “our message that goes with the tag”
Here -m does the same thing and -a is the name of the tag that you can see with the command
git log
Finally let's push it to the local bare repository called Remote.git.
First let's check the list of remotes by using this command.
git remote
Whoops! It looks like the last employee accidentally left a remote so lets delete it.
git rm origin
Now we need to link the local repository to the bare repository by using the command.
git remote add origin ../Remote.git
Origin is our name for the remote though it really could be anything you want it to but usually it is just origin.
Now we need to push the contents of our local Git repository into the bare repository by using the command.
git push origin master
Master by the way is our local git log so the first variable is the thing we are pushing to and the second variable is the source of the push.
Congratulations, you have now completed all of the basic steps of using Git!
A few things to state to help a little.
Tags are particular to just that repository so if you check the bare repository you will notice it will only have one tag. This is because I manually added the tag to this log and the new snapshot in the bare repository that you added has not yet been tagged in this repository.
Remote repositories work generally the same way as we did it in our project but the set up for it is slightly different. Instead you go to the website such as GitHub or GitBucket and you find the url for the repository you wish to push to and use that instead of the file path we used this time
There is a lot more to Git and I highly recommend “Ry’s Git Tutorial” so if you wish to learn go get the book and I hope you all have a wonderful day!